Ok, let’s start with the basics:
Building Blocks
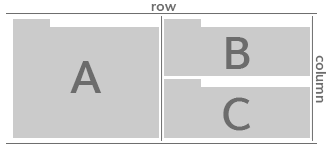
Layouts in Strelit Layout are created out of three building blocks: Rows, Columns and Stacks
-
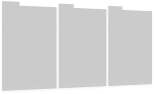
Rows arrange components horizontally along the x-axis
-

Columns arrange components vertically along the y-axis
-

Stacks arrange components on top of each other along the z-axis as tabs
All three of these building blocks can be nested within each other infinitely.
Config to Model
Have you ever used HTML? Manipulated the DOM using JavaScript? Perfect – then you know how Strelit Layout works. StrelitLayouts are created out of JSON config (think HTML) that looks like this:
var myLayout = new StrelitLayout({
    content: [{
        type: 'row',
        content:[{
            type:'react-component',
            component: 'test-component',
            props: { label: 'A' }
        },{
            type: 'column',
            content:[{
                type:'react-component',
                component: 'test-component',
                props: { label: 'B' }
            },{
                type:'react-component',
                component: 'test-component',
                props: { label: 'C' }
            }]
        }]
    }]
});
The JSON config is processed and the layout engine builds up an object tree from it. This object tree remains interactive and can (if required) be manipulated using JavaScript (think DOM), e.g.
//Open the element with 'someId' in a new window
myLayout.root.getItemsById( 'someId' )[ 0 ].popout();

//Add another component to the layout
myLayout.root.contentItems[ 0 ].addChild({
    type:'react-component',
    component: 'testComponent',
    props: { label: 'X' }
});
Components
Strelit Layout works with any react component. Just register them with
registerComponent():
var TestComponent = React.createClass({
    render: function() {
        return (<h1>{this.props.label}</h1>)
    }
});

myLayout.registerComponent( 'testComponent', TestComponent );

//Once all components are registered, call
myLayout.init();
And that's all it takes to create a layout. Make sure to include jQuery, React and ReactDOM in a way that makes it accessible to StrelitLayout.
Interactive Example: Gettins started with React
Inspect, fork, and test this complete layout implementation live on CodePen:
Container & EventHub
Now that we've got the basics covered, let's look at some more advanced features.
Containers represent the panel your component lives
in. They expose a lot of useful methods, e.g. setTitle() or
close() and emit events like resize. The container a component
lives in is exposed via a special property called glContainer. The
container also allows you to access the layout-tree above your component. For example,
to move the whole component into a new window, you'd call:
this.props.glContainer.parent.popout();
Communicating between components is always tricky, but with Strelit Layout it can be
even harder if your components are distributed across multiple windows and screens. This
is why Strelit Layout comes with an EventHub -
an EventEmitter that's global to all windows and can be used for inter-component
communication, even across windows. The eventHub is exposed through a property called
glEventHub. To raise an event across all windows, you'd call:
this.props.glEventHub.emit( 'something-happend', {some: 'data' });
Here's a ReactJS example making use of these features (give it a go, pop one or both components out and see how they're still able to interact):
Interactive Example: Complex usage with React
Inspect, fork, and test this complete layout implementation live on CodePen:
Community & Support
Need help or have architectural questions?
Whether you are building complex multi-screen trading terminals, enterprise data workspaces, or migrating from legacy layout engines, the Strelit UI Kit engineering team and community are here to help.
Open an Issue on GitHub →